EJBCA with YubiHSM 2
YubiHSM 2 works well with an existing installation of EJBCA as well as a new installation as long as the proper keys are already created on the YubiHSM 2.
Due to design and implementation choices, there are some peculiarities when generating or importing keys into the YubiHSM 2 using SunPKCS#11 provider and YubiHSM 2 PKCS#11 module. JAVA SunPKCS#11 provider requires the ability to change a key’s properties after creation in order for it to be able to use the keys later on. However, YubiHSM 2 does not allow such operation (All key properties have to be set at the time of creation and cannot be changed after the fact). This guide will describe 3 ways to work around this limitation.
|
Note
|
After generating new keys on the YubiHSM 2 for use by an existing installation of EJBCA, the relevant crypto token must be reactivated before the new keys are accessible by EJBCA. |
|
Note
|
Once keys are visible on EJBCA Adminweb, testing and removing them can be done via the Crypto Token overview page regardless of how they were generated. |
|
Note
|
A key alias on EJBCA is equivalent to a key label on the YubiHSM 2. |
Prerequisites
Download the installation package suitable for the operation system from the Yubico Developers website. The following packages should be installed:
-
YubiHSM Shell (Optional depending on the method used to generate asymmetric keys)
-
YubiHSM Setup (Optional depending on the method used to generate asymmetric keys)
Generating Keys for EJBCA
EjbcaClientToolBox with YubiHSM 2 PKCS#11 module 2.4.0 or later
With a new PKCS#11 module, it is possible to use ejbcaClientToolBox to generate keys on the YubiHSM 2. For this to work,
a configuration file is used to specify the attributes required for this operation.
Example command to generate RSA key of length 2048 with the alias test_key:
./ejbcaClientToolBox PKCS11HSMKeyTool generate /path/to/sunpkcs11.config 2048 test_key
The content of sunpkcs11.config should be:
name=YubiHSM2
library=/path/to/yubihsm_pkcs11.so
slot=0
attributes(*,CKO_PRIVATE_KEY,CKK_RSA) = {
CKA_TOKEN = true
CKA_SIGN = true
}
attributes(*,CKO_PRIVATE_KEY,CKK_EC) = {
CKA_TOKEN = true
CKA_SIGN = true
}
This will ensure that any RSA or EC keys generated on the YubiHSM 2 will be given the capability to sign and have the
CKA_TOKEN attribute set to the accepted value.
|
Note
|
This method will create additional objects on the YubiHSM 2 (See the section about "PKCS#11 with JAVA"
and the subsection about the later versions on PKCS#11 with YubiHSM 2 for
details). So if the number of objects created on the YubiHSM 2 is an issue, use yubihsm-setup or yubihsm-shell
to generate the keys instead. |
yubihsm-setup or yubihsm-shell
Either yubihsm-setup or yubihsm-shell can be used to make sure that both the generated keys and their corresponding
X509Certificates are stored under the same ObjectID on the YubiHSM 2. To do so, follow the instruction under the section
about "PKCS#11 with JAVA" and the subsection about the earlier versions on
PKCS#11 with YubiHSM 2
Configuring a New EJBCA Installation
|
Note
|
Generating keys on the YubiHSM 2 during the EJBCA installation process is not tested, so it is recommended to use one of the methods described above to generate the keys before starting to install EJBCA |
|
Note
|
It is recommended that the YubiHSM 2 PKCS#11 module and all related configuration files be owned by the same user that runs the application server. |
While following the installation instructions provided by EJBCA, the instructions below need to be executed before deploying EJBCA for the first time:
1 . Decide how many keys to generate and what aliases they should have.
See the documentation in EJBCA_HOME/conf/catoken.properties.sample for
recommendation on what keys should be generated.
2 . Use one of the methods described above in "Generating Keys for EJBCA" to generate the keys on the YubiHSM 2, one
at a time. If using yubihsm-shell, use the capabilities
sign-pkcs,sign-pss,sign-attestation-certificate for RSA keys and sign-ecdsa,sign-attestation-certificate for EC
keys.
3 . If new keys are to be generated using EJBCA Adminweb, create the file yubishm_pkcs11_attributes.conf
with the following content (See the note under "EjbcaClientToolBox with YubiHSM PKCS#11 module 2.4.0 or later" for
details on why that might not be desirable):
attributes(*,CKO_PRIVATE_KEY,CKK_RSA) = {
        CKA_TOKEN = true
        CKA_SIGN = true
}
attributes(*,CKO_PRIVATE_KEY,CKK_EC) = {
        CKA_TOKEN = true
        CKA_SIGN = true
}
Make sure that yubishm_pkcs11_attributes.conf is owned by the same user that runs the application server.
4 . Set the environment variable YUBIHSM_PKCS11_CONF to the path of the
yubihsm_pkcs11.conf file. See PKCS#11 with YubiHSM 2
for the content of that file. Make sure that it is set in the same environment where the application server will be
running.
5 . When configuring EJBCA, make sure to include the following configurations in the properties files:
-
EJBCA_HOME/conf/catoken.properties:sharedLibrary=/path/to/yubihsm_pkcs11.so slotLabelType=SLOT_NUMBER slotLabelValue=0 Keys and their aliases as were created in step 2
-
EJBCA_HOME/conf/install.properties:ca.tokentype=org.cesecore.keys.token.PKCS11CryptoToken #ca.tokenpassword=null ca.tokenproperties=<EJBCA_HOME>/conf/catoken.properties
-
EJBCA_HOME/conf/web.properties:cryptotoken.p11.lib.255.name=<label to identify the YubiHSM 2> cryptotoken.p11.lib.255.file=/path/to/yubihsm_pkcs11.so If new keys are to be generated using EJBCA Adminweb, fill the following two lines too cryptotoken.p11.attr.255.name=<label to identify the attribute file> cryptotoken.p11.attr.255.file=/path/to/yubishm_pkcs11_attributes.conf
|
Note
|
The number 255 is just an example. It can be any "available" number.
See documentation in EJBCA_HOME/conf/web.properties |
Configuring an Existing EJBCA installation
1 . If new keys are to be generated using EJBCA Adminweb, create the file yubishm_pkcs11_attributes.conf
with the following content (See the note under "EjbcaClientToolBox with YubiHSM PKCS#11 module 2.4.0 or later" for
details on why that might not be desirable):
attributes(*,CKO_PRIVATE_KEY,CKK_RSA) = {
CKA_TOKEN = true
CKA_SIGN = true
}
attributes(*,CKO_PRIVATE_KEY,CKK_EC) = {
CKA_TOKEN = true
CKA_SIGN = true
}
Make sure that yubishm_pkcs11_attributes.conf is owned by the same user that runs the application server.
2 . Set the environment variable YUBIHSM_PKCS11_CONF to the path of the
yubihsm_pkcs11.conf file. See PKCS#11 with YubiHSM 2
for the content of that file. Make sure that it is set in the same environment where the application server will be
running.
3 . Configure EJBCA_HOME/conf/web.properties as follows (255 is just an example, read the
documentation in the file for more details):
cryptotoken.p11.lib.255.name=<label to identify the YubiHSM 2>
cryptotoken.p11.lib.255.file=/path/to/yubihsm_pkcs11.so
If new keys are to be generated using EJBCA Adminweb, fill the following two lines too
cryptotoken.p11.attr.255.name=<label to identify the attribute file>
cryptotoken.p11.attr.255.file=/path/to/yubishm_pkcs11_attributes.conf
4 . Re-deploy EJBCA and restart the application server
5 . On EJBCA Adminweb, create a new CryptoToken:
-
Go to CA Functions → Crypto Tokens
-
Click on "Create new…"
-
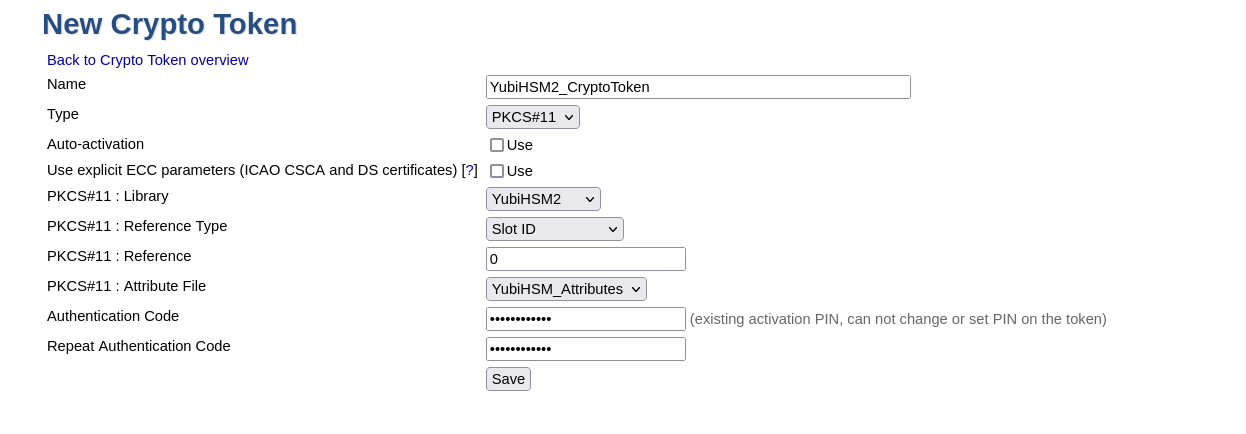
Configure the new CryptoToken as follows:
-
Name: <name for this crypto token>
-
Type: PKCS#11
-
Authentication Code: <password to open a sessoin on the YubiHSM 2. See PKCS#11 with YubiHSM 2 → Logging In >
-
PKCS#11 : Library: <from the drop down menu, choose the label you set in step 3>
-
PKCS#11 : Reference Type: Slot ID
-
PKCS#11 : Reference: 0
-
PKCS#11 : Attribute File: <from the drop down menu, choose "Default" or the label you set for the attribute file in step 3 >
-
-
Click "Save". If there already are keys on the YubiHSM 2, a list of them will be displayed now (only keys with corresponding X509Certificates that can be accessed using the same ID will be displayed).
|
Important
|
The slot number of the shared PKCS#11 library has to be 0. |
6 . When generating new keys, either use one of the methods described under "Generating Keys for EJBCA" (make sure to
deactivate and reactivate the Crypto Token before the new keys are ready to be used), or use EJBCA Adminweb to create
the new keys if web.properties is configured to do so.