ssh -V
Securing SSH Authentication with FIDO2 Security Keys
Introduction: The Power of FIDO2 for SSH
Secure Shell (SSH) is a cornerstone of secure remote access and operations for developers. Traditionally, SSH relies on public-key cryptography, where private keys are stored as files on your computer. While secure, these files can be targets for theft or unauthorized access.
FIDO2 security keys, such as the YubiKey, strengthen SSH security by ensuring your private SSH keys never leave the hardware security key. This provides strong protection against malware, phishing, and remote attacks targeting your SSH credentials.
FIDO2 also requires user presence (a touch on your YubiKey) for cryptographic operations, and can optionally enforce user verification (PIN entry). These safeguards ensure that even if your workstation is compromised, attackers cannot use your SSH keys without your explicit physical approval.
This guide shows how to generate and use SSH keys directly on your FIDO2 security key with OpenSSH. It covers key generation, platform setup, GitHub integration, and security best practices.
Prerequisites
You will need:
-
A FIDO2 Security Key: Any YubiKey with FIDO2 support (YubiKey 5 Series, YubiKey Bio Series, Security Key Series by Yubico).
-
OpenSSH Client:
-
OpenSSH 8.2 or newer is required for FIDO2 hardware-backed keys.
-
OpenSSH 8.3 or newer is required to download resident keys from the security key with
ssh-keygen -K. -
OpenSSH 8.4 or newer is required for the
verify-requiredoption, which enforces user verification (PIN) for each operation.
-
-
YubiKey Manager: Required for setting or changing your FIDO2 PIN. Download it from the Yubico website.
|
Note
|
Having a recent enough OpenSSH version is necessary but not always sufficient. The OpenSSH build must also be compiled with FIDO support (libfido2). Apple’s bundled macOS OpenSSH is not, so macOS needs Homebrew OpenSSH. The built-in Windows OpenSSH did not include FIDO before version 8.9, but current Windows builds (9.x) do. See the platform notes below. |
Platform-Specific OpenSSH Setup
Check your OpenSSH version:
Update if necessary:
-
Linux:
# Debian/Ubuntu
sudo apt update && sudo apt install openssh-client

# Fedora/RHEL/CentOS
sudo dnf install openssh-clients
-
macOS:
The bundled OpenSSH is not compiled with
libfido2, so it cannot generate or use-sk(FIDO2) key types, regardless of version. Install OpenSSH from Homebrew, which includes FIDO support:brew install openssh
Update your
PATHto prioritize the Homebrew version (/usr/local/binon Intel,/opt/homebrew/binon Apple Silicon). Confirm withwhich ssh-keygen. -
Windows:
FIDO support for the Windows OpenSSH client was added in version 8.9; earlier builds do not have it. The built-in version varies by Windows release and patch level, so do not assume yours is new enough. Check it:
ssh -V
If it reports 8.9 or newer, the built-in client supports FIDO. If it is older, update Windows, or install the latest Win32-OpenSSH release and put it ahead of the built-in client on your
PATH.NoteIf you have more than one OpenSSH installed (for example Git for Windows also bundles one), ssh -Vreports whichever comes first on yourPATH, which may not be the built-in client. To check the built-in client specifically, runC:\Windows\System32\OpenSSH\ssh.exe -V.NoteWorking in WSL2? The OpenSSH inside WSL2 cannot reach a USB security key directly. See Securing SSH and Git Commit Signing with FIDO2 on WSL2 for a setup that routes WSL2 through the Windows FIDO components. Alternatives:
-
Git Bash (from Git for Windows) bundles a FIDO-capable OpenSSH. Some features (like resident keys) may not work depending on the Git Bash version, and older builds may require an elevated prompt; if you hit issues, use the Windows OpenSSH client instead.
-
Setting or Changing Your FIDO2 PIN
For stronger security, set a FIDO2 PIN on your YubiKey:
-
Insert your YubiKey.
-
Open YubiKey Manager.
-
Navigate to Applications > FIDO2.
-
Select "Set PIN" (or "Change PIN").
-
Follow the prompts to create a secure PIN.
The PIN will be required when generating resident keys and when user verification is enforced.
Generating Your FIDO2 SSH Key
Recommended: ed25519-sk Resident Key
For the strongest setup, generate an ed25519-sk resident key that requires a PIN on every use:
ssh-keygen -t ed25519-sk -O resident -O verify-required -C "your_email@example.com"
This combines three protections:
-
-t ed25519-sk: a modern EdDSA key backed by the security key. Requires YubiKey firmware 5.2.3 or newer; on older firmware, useecdsa-skinstead (see below). -
-O resident: stores the credential on the YubiKey itself, so you can recover it on another machine withssh-keygen -Kinstead of copying files. Requires a YubiKey with FIDO2 credential management (firmware 5.2.3+) and a FIDO2 PIN. -
-O verify-required: requires user verification for every use, in addition to a touch. Verification is a FIDO2 PIN on most YubiKeys, or a fingerprint on the YubiKey Bio Series.
ssh-keygen produces a key handle file (for example id_ed25519_sk) and a public key file (id_ed25519_sk.pub). The handle file does not contain your private key, only a reference that tells OpenSSH which credential on the YubiKey to use; the private key never leaves the hardware.
If Your YubiKey Doesn’t Support ed25519-sk
ecdsa-sk works on all FIDO2 YubiKeys. Use the same options:
ssh-keygen -t ecdsa-sk -O resident -O verify-required -C "your_email@example.com"
If You Don’t Need a Resident Key
Resident keys require firmware 5.2.3+ and a FIDO2 PIN. If you don’t need to recover the key on other machines, omit -O resident to create a non-resident key. The credential ID is then stored only in the key handle file on disk:
ssh-keygen -t ed25519-sk -O verify-required -C "your_email@example.com"
You can still require a PIN with -O verify-required, or drop it as well for a touch-only key.
Additional Options
-
-O application=ssh:<name>: Labels the credential so you can store more than one resident key on the same YubiKey without overwriting. The name must start withssh:, for example-O application=ssh:githubor-O application=ssh:work-server. -
-C "comment": Helps identify the key (for example, your email or the target service).
The Key Generation Process
-
Prompt to touch your YubiKey (user presence).
-
If verification is required, prompt for user verification (a FIDO2 PIN, or a fingerprint on the Bio Series).
-
Choose a save location for the key handle file. This file does not contain the private key, only a reference handle.
-
Optionally set a local passphrase for the handle file.
The .pub file is your public key for servers or GitHub.
Adding Your FIDO2 SSH Key to the ssh-agent (Optional)
Unlike software keys, FIDO2 keys never export private key material. The file added with ssh-add is just a reference handle.
Key points:
-
ssh-agentremembers the reference, so you don’t need to re-specify the file. -
The agent never caches your PIN—you’ll be prompted if verification is required.
-
A touch (presence) is always required unless
-O no-touch-requiredwas explicitly set.
To add your key:
eval "$(ssh-agent -s)"
ssh-add ~/.ssh/id_ed25519_sk
Replace id_ed25519_sk with the filename you chose during key generation. You will be prompted for your PIN (if required) and to touch your YubiKey.
Integrating with GitHub (and other services)
-
Copy your public key:
# Linux
cat ~/.ssh/id_ed25519_sk.pub | xclip -selection clipboard
# macOS
pbcopy < ~/.ssh/id_ed25519_sk.pub
# Windows
Get-Content $env:USERPROFILE\.ssh\id_ed25519_sk.pub | Set-Clipboard
-
Add it in GitHub: go to Settings > SSH and GPG keys, select New SSH key, paste the key, label it, and save.
-
Test:
ssh -T git@github.com
You should be prompted to touch your YubiKey (and enter your PIN if required).
How It Works
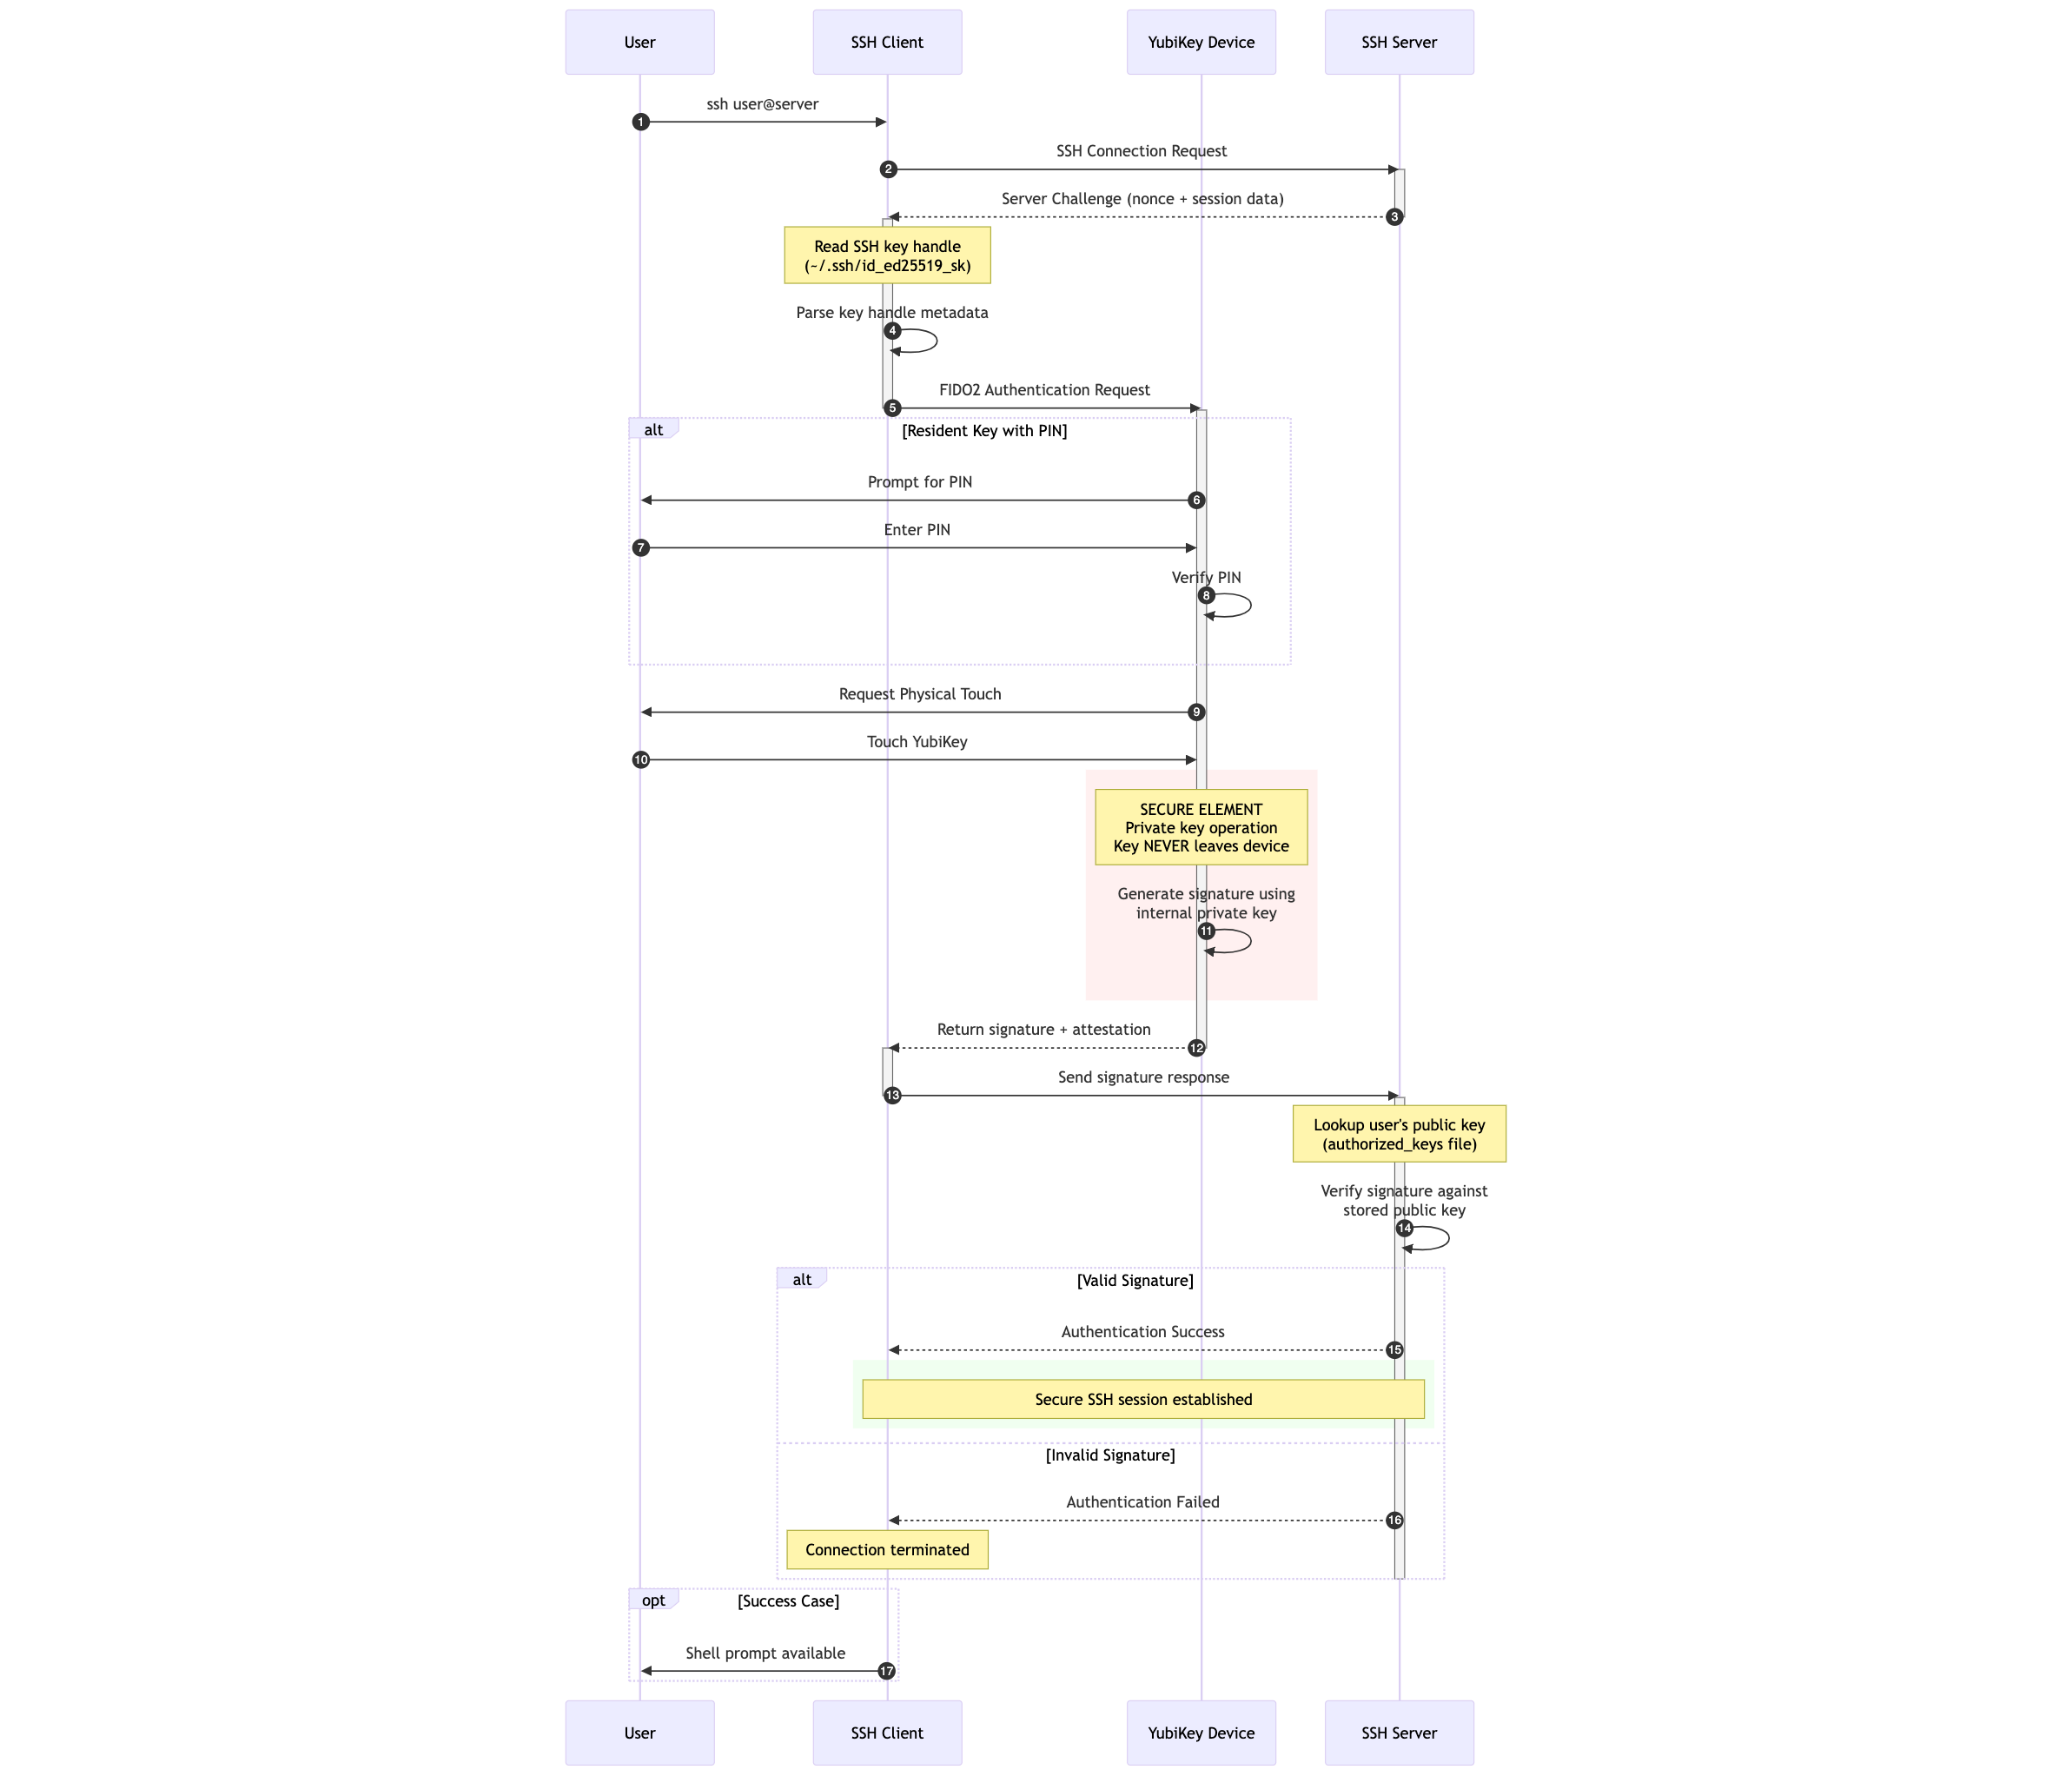
The diagram below shows what happens when you authenticate: the server sends a challenge, your client passes it to the YubiKey, you approve with a touch (and PIN if required), and the YubiKey signs the challenge with the private key that never leaves the hardware.
Using Resident Keys on a New Machine
Resident keys allow portability. On a new machine:
-
Ensure OpenSSH 8.3+ is installed (downloading resident keys requires 8.3 or newer).
-
Insert your YubiKey and run (on Windows, use an elevated Command Prompt):
ssh-keygen -K
This retrieves resident keys and creates handle and public key files. 3. Use normally or add to
ssh-agent.
Troubleshooting
-
Permission denied / no prompt: Verify the correct public key is installed. Use
ssh -vvvfor debugging. -
macOS issues: The bundled OpenSSH lacks FIDO support; install OpenSSH via Homebrew and ensure it is ahead of the system version on your
PATH. -
Unsupported key type / invalid format: Ensure OpenSSH 8.2+ (8.4+ for verify-required) and that the build includes FIDO support. On Windows, the built-in client needs 8.9+ for FIDO; see the platform notes above.
-
PIN issues: If forgotten, reset the FIDO2 application in YubiKey Manager. This deletes all FIDO2 credentials.
-
Multiple keys: Use
ssh-keygen -Kto download resident keys from the YubiKey to the current directory. Use-O application=ssh:<name>when creating keys to keep multiple resident credentials distinct. -
GitHub issues: See GitHub’s SSH troubleshooting guide.
Important Security Considerations
-
Protect your YubiKey physically. Consider a backup key.
-
Use a strong, unique PIN for FIDO2.
-
Avoid SSH agent forwarding (
ssh -A) unless necessary. Forwarding exposes your keys’ usability to remote systems. -
Secure your workstation. Keep it patched and monitored.
-
Protect non-resident key handle files. Use a passphrase and restrict file permissions.
Conclusion
Using a FIDO2 security key like the YubiKey for SSH authentication ensures your private keys remain hardware-bound and safe. By enforcing both user presence (touch) and user verification (PIN), you gain strong protection against credential theft and misuse.
Following this guide, you can confidently integrate YubiKeys with OpenSSH and GitHub, improving your security posture and reducing risks from common attacks.
Always consult the latest Yubico and OpenSSH documentation for updates and new capabilities.