The U2F libraries are now deprecated and no longer maintained. We highly recommend transitioning to the FIDO2 libraries for enhanced security and compatibility.
|
C
|
|
|
Java
|
|
|
Python
|
|
|
\.NET
|
The U2F libraries are now deprecated and no longer maintained. We highly recommend transitioning to the FIDO2 libraries for enhanced security and compatibility.
|
C
|
|
|
Java
|
|
|
Python
|
|
|
\.NET
|
Let us have a look at the U2F sequence diagram:
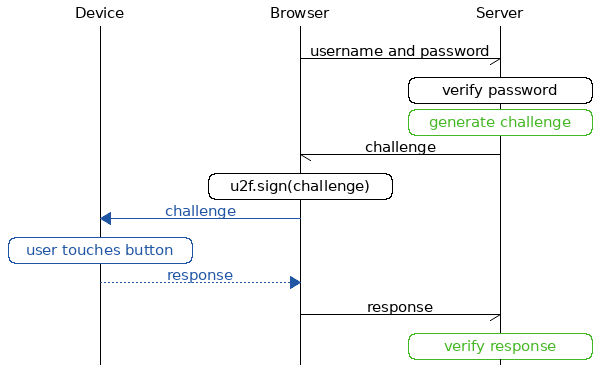
The blue part is handled by the U2F client (e.g. the web browser) and the green parts are handled by the U2F server library.
A server-side U2F library has 4 basic functions: Start registration, Finish registration, Start authentication and Finish authentication. Below is an example of how these functions can be used in a web server:
# handles HTTPS requests to /start_registration
def start_registration(username):
  challenge = u2f_lib.start_registration(APP_ID)
  challenge_store.set(username, challenge)
  return challenge
# handles HTTPS requests to /finish_registration
def finish_registration(username, device_response):
  challenge = challenge_store.pop(username)
  registered_device = u2f_lib.finish_registration(challenge, device_response)
  device_store.set(username, registered_device)
  return "Success!"
# handles HTTPS requests to /start_authentication
def start_authentication(username, password):
  verify_user_pass(username, password)
  registered_devices = device_store.get(username)
  challenge = u2f_lib.start_authentication(registered_devices, APP_ID)
  challenge_store.set(username, challenge)
  return challenge
# handles HTTPS requests to /finish_authentication
def finish_authentication(username, password, device_response):
  challenge = challenge_store.pop(username)
  u2f_lib.finish_authentication(challenge, device_response, registered_devices)
  return "Success!"
In the example above challenge_store is a DAO that stores
challenges temporarily. The other DAO, device_store, persists data permanently. For most cases,
APP_ID is the base URL of this web app, for example:
APP_ID = "https://login.example.com"
…or, when developing locally:
APP_ID = "https://localhost:8080"
|
Note
|
U2F only works on HTTPS webpages. |
This section assumes that you are building a web site. If this is not the case, have a look at our WebAuthn libraries instead. Also note that Chrome is currently the only web browser supporting U2F.
The main part of the client is to be a middle-man between the server and the U2F device.
The easiest way to use U2F in a supported browser is to use the u2f-api.js library, which exposes two functions:
u2f.register
|
Register using a U2F device. |
u2f.sign
|
Authenticate using a U2F device. |
<!-- u2f-login.html -->
<script src="/path/to/u2f-api.js"></script>
<script>
var challenge = ...  u2f.sign([challenge], [],
function(deviceResponse) {
document.getElementById('response-input').value = JSON.stringify(deviceResponse)
document.getElementById('login-form').submit()
u2f.sign([challenge], [],
function(deviceResponse) {
document.getElementById('response-input').value = JSON.stringify(deviceResponse)
document.getElementById('login-form').submit()  }
);
</script>
}
);
</script>
| From the server (e.g. this row could be dynamically generated by the server). |
| Send device response back to server. |
When registering a new device u2f.register is used instead of u2f.sign. The complete U2F JavaScript API can
be found here.
For a complete example, see this demo server.
For complete example code (both server and client) in various languages, have a look at respective U2F library's accompanied demo server.
If you get an error, check out the client error codes.