Allow list implementation guidance
An allow list is a curated list of authenticators that should be permitted to register and authenticate to your application. Any authenticator that is not identifiable, or part of your curated list should be rejected. This scenario works well for applications that require a more secure and controlled environment, and where you want to ensure that your users are leveraging high assurance authenticators. The guidance given on this page will teach you how to implement an allow list in your application, that will limit registrations to a few select authenticators.
This scenario works best when:
-
Your organization requires the use of a set of approved authenticators
-
You want to prevent users from registering authenticators like copyable aka multi-device passkeys
-
You are required to limit registrations to high assurance devices
User experience
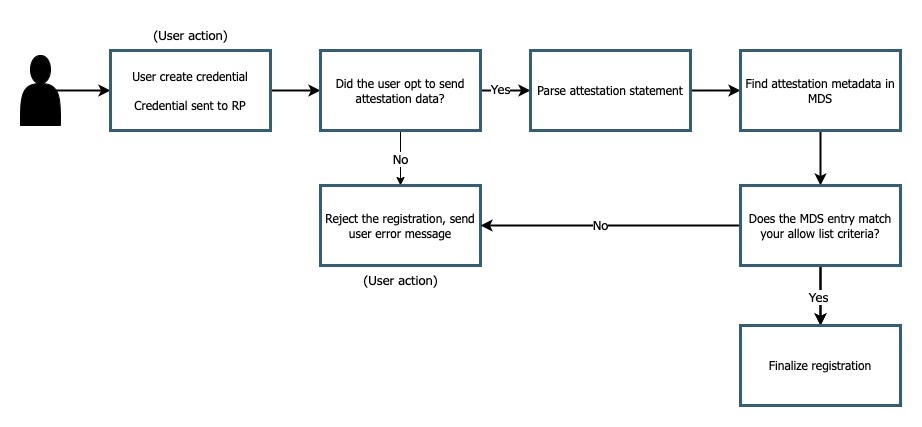
Figure 1 demonstrates a sample user experience for a registration process that implements an allow list
Figure 1
In this flow the happy path comes from a user who immediately opts into sending attestation data, and ensuring that they are using an authenticator that is allowed in your environment.
It’s worth noting that in this experience most of the logic/decision points are left up to the application, with little intervention from the user, aside from creating the initial registration, and reacting to any request rejections.
Here are some considerations for this flow:
-
Ensure that your users know to allow for attestation data to be sent during the registration ceremony, this can be done by modals, tipboxes, or instructions on your client application
-
Ensure that users know which of their authenticators to use for the application
-
Ensure error messages accurately reflect the issue at hand so that users have a better chance to self remediate
Prerequisites
Before you attempt to follow this implementation guidance, ensure that you have added the MDS to your application. Guidance for adding MDS to your application can be found on our page, FIDO Metadata Service (MDS)
Our examples also leverage Yubico’s java-webauthn-server; a server side library for Java that provides features to help you implement a WebAuthn relying party. Some of the methods used below will come directly from this library.
Implementation guidance
Allow only trusted attestation
One immediate modification will be needed from the code introduced in the MDS guidance linked above. In this flow you must opt to only accept registrations from trusted attestation sources. This means that any registration sent to your application must include an attestation statement. If a user opts not to send an attestation statement, then their registration should be rejected. A user request may also be rejected if the authenticator they are using is not included in the MDS.
Some authenticators may also send attestation in the form of Anonymous Attestation. While this is a form of attestation, it’s often not possible to determine the device of origin from these statements. In the case of our example any authenticator sending anonymous attestation will be rejected.
To achieve this using the java-webauthn-server, ensure that you set allowUntrustedAttestation() to false. This will ensure that any registration sent without an attestation statement, or an attestation statement not found in the MDS is rejected.
Figure 2 demonstrates how you should initialize your RelyingParty object in your application, using false for allowUntrustedAttestation()
RelyingParty rp =RelyingParty.builder()
  .identity(/*... */)
  .credentialRepository(/*... */)
  .attestationTrustSource(mds)
  .allowUntrustedAttestation(false);
  .build();
Figure 2
If you were only looking to use the MDS as your allow list, only accepting trusted attestation, then no other code is needed. The following sections will go over how to further reduce the scope of trusted attestation to a few selected authenticators.
Rejecting untrusted attestation will also help when attempting to block copyable passkeys. This is due to the fact that the copyable passkey implementations announced from Microsoft, Apple, and Google will not send attestation data during registration. By this logic, if you block any credential missing attestation data, then there’s a good chance that you’re blocking a copyable passkey.
Allow only specific authenticators
Next up is to create a list of the authenticators that you want to allow in your application. There are a few different identifiers that you can use from a metadata statement, but your two safest bets will be by AAGUID or the attestation root certificate. In this example we are going to leverage the AAGUID as the device identifier. An AAGUID is the unique identifier given to every authenticator in the MDS.
AAGUID mappings for Yubikeys can be found in this support article. For non YubiKey AAGUIDs you can search the MDS manually or work with your authenticator manufacturer to find your specific AAGUIDs.
For this example we are going to be leveraging the AAGUIDs for the YubiKey 5Ci FIPS and YubiKey 5 FIPS Series with NFC.
You can declare this list in a variety of different ways, in this example we will declare it as an ArrayList of strings.
Figure 3 demonstrates how to declare a new array with your curated list of AAGUIDs.
private final ArrayList<String> aaguids =
  new ArrayList<String>(
    Arrays.asList("85203421-48f9-4355-9bc8-8a53846e5083 ",
      "c1f9a0bc-1dd2-404a-b27f-8e29047a43fd"
  ));
Figure 3
Now that you have a list of AAGUIDs that you want to be accepted, let’s ensure that our instance of the MDS only contains entries for our curated list.
We will accomplish this by attaching a filter operation when we initialize the MDS in our application.
Figure 4 demonstrates the statement needed to filter your instance of MDS to only allow your curated authenticator list.
MetadataBLOB blob = downloader.loadCachedBlob();

FidoMetadataService mds = FidoMetadataService.builder()
  .useBlob(blob)
  .prefilter(entry -> entry.getAaguid()
    .map(aaguid -> aaguids.contains(aaguid.asGuidString()))
    .orElse(false))
  .build();
Figure 4
In the code sample above you are iterating through the entire MDS. You will retain each metadata statement for each entry that has an AAGUID that is contained in your curated list. Your final list will only contain entries that are related to the items marked in your AAGUID list.
The reason this filtering technique works is because the scope of your MDS is reduced to your desired authenticators. This means that your application will not deem authenticators out of this scope as trusted as there are no metadata entries to compare the AAGUID and trust root of an attestation statement sent during registration.
It should be noted that it’s not as simple as an attacker spoofing the AAGUID to gain access to your environment. Your curated AAGUID list is only meant to act as a filtering mechanism. The actual trust operation done by the java-webauthn-server will compare both the AAGUID and trust root certificate sent by the device, which gives a higher degree of assurance that your authenticator is the make and model it says it is.
This flow will allow you to limit registration to your application to only a specified and trusted set of authenticators. Click below to return to the authenticator management guidance.