Deploying YubiHSM 2 with Active Directory Certificate Services
With a YubiHSM 2 device now configured for use with YubiHSM Key Storage Provider and Microsoft Active Directory Certificate Services, the next set of steps covers the deployment in the ADCS environment. Note that YubiHSM Key Storage Provider software must be installed on the system before proceeding.
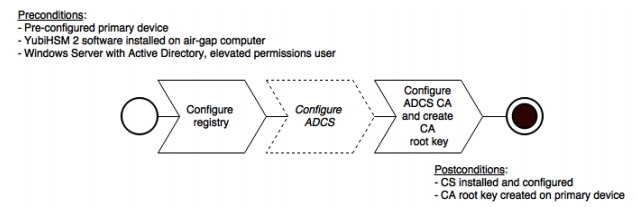
Deploying YubiHSM consists of three steps as follows. These steps are described in detail in the following procedure.
-
Configuring the Windows Registry for the YubiHSM Key Storage Provider for the primary YubiHSM 2 device that was configured earlier
-
Configuring ADCS (if not already present)
-
Configuring a new ADCS CA with a root CA key being generated on the device
The host that these steps are performed on is assumed to be a member server in the Active Directory domain (domain-joined, not a Domain Controller).
These instructions include steps for a basic configuration and should be performed by an experienced system administrator.
Configuring the Windows Registry
For ADCS to use the YubiHSM 2, the following registry entries need to be changed from their default values. The HKEY_LOCAL_MACHINE\SOFTWARE\Yubico\YubiHSM subkey was created during installation. Be sure to make a backup of your Registry before you make any changes.
To configure the Windows Registry
-
Click Start > Run, type regedit in the Run dialog box, and click OK.
-
Locate and then click the registry subkey for YubiHSM (
HKEY_LOCAL_MACHINE\SOFTWARE\Yubico\YubiHSM). -
To change the URI where the connector is listening, change the following entry:
“ConnectorURL”=http://127.0.0.1:12345 -
To change the ID of the application authentication key (object ID 3 was used as an example in this guide; if you used another object ID be sure to enter the correct information). For our example, because the hexadecimal value of 0x00000003 resolves to “3” in the Windows Registry, change the entry as follows:
“AuthKeysetID”=3 -
To change the password for the application authentication key that is stored in the registry change the entry for:
“AuthKeysetPassword”={password}The password is stored here for the Key Storage Provider to use when authenticating to the device. -
To save your changes, exit the Windows Registry.
The YubiHSM Connector service reads the configuration file, yubihsm-connector-config.yaml.
Depending on your local setup, for instance if you are running multiple instances of the software on the same host, you may need to edit this configuration file to make sure that parameters are consistent between the configuration file and the Windows Registry. On Windows, the yubihsmconnector.config.yaml file is available at C:\programdata\yubiHSM\yubihsmconnector.yaml - you will need administrator rights to modify the file.
Setting Up Your Enterprise Certificate Authority
To configure ADCS
If you already have Certification Services installed, you can skip these steps.
-
On a Windows Server host, joined to an existing Active Directory domain, log on into the server as a domain administrator.
-
Click Start > Administrative Tools, then click Server Manager.
-
Under Roles Summary, click Add roles and features.
-
Use the Add Roles and Features Wizard to add the Active Directory Certificate Services role, and click Next.
-
In the Select role services wizard page, select the option for Certification Authority, then click Next.
-
Complete the wizard and reboot the host if prompted.
To configure the ADCS CA and create the Root Key After you have completed the feature installation, you need to create the Enterprise CA instance.
-
If you haven’t already, do the following:
-
On a Windows Server host, joined to an existing Active Directory domain, log into the server as a domain administrator.
-
Click Start > Administrative Tools, then click Server Manager.
-
-
In Server Manager, start the Add Roles and Features Wizard and select Role-based or featurebased installation. Click Next.
-
In the Credentials page, confirm that you are logged in as a domain administrator. If you are not, you will not be able to create an Enterprise CA in the subsequent steps. Click Next.
-
In the Role Services page, select the option for Certification Authority, and then click Next.
-
In the Setup Type page, select the option for Enterprise CA, and then click Next.
-
In the CA Type page, select the option for Root CA, and then click Next.
-
In the Private Key page, select the option for Create a new private key, and then click Next.
-
In the Cryptography for CA page, do the following:
-
Click Select a cryptographic provider and select RSA#YubiHSM Key Storage Provider from the list displayed. This indicates that the root key should be generated on the device.
-
Click Key Length and select the key size you want from the list displayed. Options for key size 2048-bit or 4096-bit. The default setting is 2048.
-
For Select the hash algorithm for signing certificates issued by this CA, select a desired hash algorithm, such as SHA256. The default setting is SHA256.
-
Select the option to Allow administrator interaction when the private key is accessed by the CA. This allows the private key to be exported for backup purposes (so it can be restored to another server). Click Next.
-
-
In the CA Name page, accept the defaults. Click Next.
-
In the Validity Period page, accept the default or set another validity period appropriate for your purposes. Click Next.
-
In the CA Database page, accept the default location for logs. Click Next.
-
In the Confirmation page, the important detail is that the YubiHSM Key Storage Provider is being used to store the CA private key. Click Configure.
-
The Progress page appears, briefly, as the local CA database is created, and changes are written to Active Directory.
-
Finally, confirm the presence of the Configuration succeeded message in the Results page. Click Close.