Using a Yubico OTP library
|
Note
|
Yubico OTPs can be validated by YubiCloud. Throughout this document we will refer to both these alternatives simply as YubiCloud. |
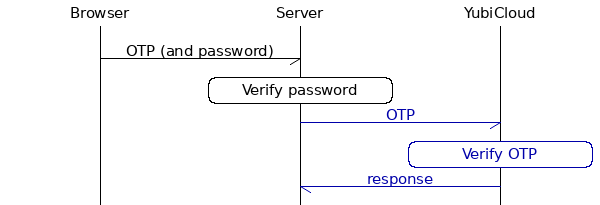
This sequence diagram describes a typical Yubico OTP implementation:

By using a library, you abstract away the communication with YubiCloud (highlighted in blue above).
Verifying OTPs
We start by creating a YubiCloud client to be able to send requests to YubiCloud. For example:
# clientId and secretKey is retrieved from https://upgrade.yubico.com/getapikey
client = Yubico(clientId, secretKey)
Now we can verify OTPs:
# otp is the OTP from the Yubikey
otp_is_valid = client.verify(otp)
After validating the OTP, you also want to make sure that the YubiKey belongs to the user logging in. This is done by comparing the first 12 characters of the OTP (which is the YubiKey’s ID) with the YubiKey ID that is associated with the user:
assert otp[:12] == user.yubikey_id
Provisioning YubiKeys
Provisioning is simply a matter of associating the first 12 characters of an OTP with a user in your user database.
user.yubikey_id = otp[:12]
Then, if you are using a SQL database, you might want to store it like this:
| YubiKeyID | UserId |
|---|---|
ccfucnlcrrne |
1890 |
ccnnloposxxc |
4371 |
cccilddkfopf |
2285 |
Self-provisioning
You can allow users to provision YubiKeys themselves. This is called self-provisioning and works like this:
-
On your website, provide the option for users to associate a YubiKey with their account. When a user registers, verify the OTP to make sure that the key is valid.
-
Later the user comes back to your site. Since the user has an associated YubiKey, ask for an OTP (that you verify) before logging her/him in.
Client-side
The client-side (browser-side) is not handled by libraries. Luckily, you just have to add another text field to your existing login form. From a user point of view, press Enter is replaced with touch the YubiKey button.
Available libraries
Have a look at the List of libraries.
Getting help
Feel free to create a topic in our forum or an issue in respective library’s GitHub project.